7. FX page
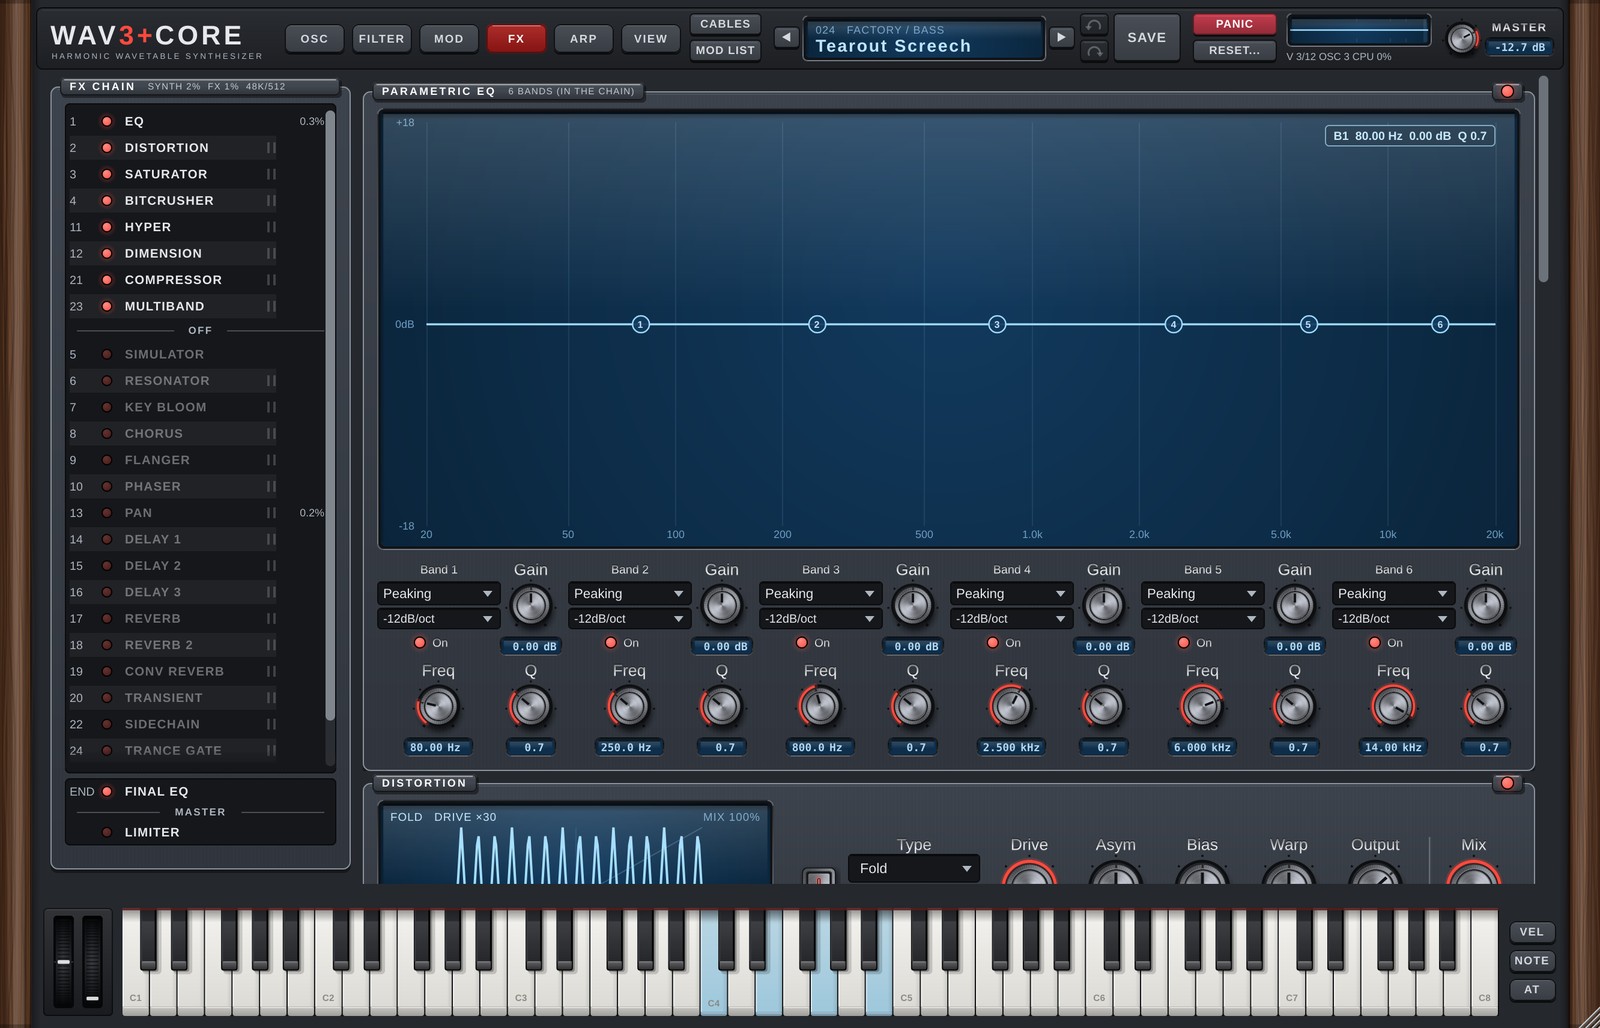
FX CHAIN
The FX CHAIN on the left lists the 26 effects in the order the sound passes through them.
- Click a row to show that effect's panel on the right (the rack scrolls to it, see below).
- The dot at the left of a row turns the effect on or off.
- Drag a row to change the order.
- (v1.6) On on top, off below: the effects that are on are listed first, in the order the sound passes through them. Below a thin OFF line come the effects that are off (dimmed, in their chain order). Turning an effect on moves it to the end of the on group (the last effect before FINAL EQ); turning it off moves it to the top of the off group. Dragging an off effect up into the on group turns it on at that place; dragging an on effect below the OFF line turns it off. Off effects pass no sound, so this regrouping never changes the sound. The number at the left of a row is its position in the chain (the same number as "From #N" in an oscillator's FX In; sources that enter the chain in the middle are moved along so that they still pass the same effects).
- (v1.6) Opening an older song or preset does not reorder anything. If its chain mixes on and off effects, the list only shows them grouped; the stored order changes the first time you turn an effect on or off or drag a row.
- (v1.6) The list is 25 rows tall and scrolls when there are more rows (mouse wheel, or the slim bar at the right edge). While dragging a row, move it near the top or bottom edge of the list to scroll automatically. When an effect is selected from somewhere else, the list scrolls so that its row is visible. The FINAL EQ / MASTER / LIMITER box at the bottom does not scroll.
- "‖" at the right of a row puts that effect in parallel with the one above it. Parallel effects receive the same signal and their outputs are added (the dry signal is mixed in only once). (v1.6) A parallel block moves as one: dragging any of its rows, or turning it on or off, moves the whole block. A block counts as on while at least one of its effects is on. The first row of the off group has no "‖" (on and off effects are not joined).
- The % at the right end of a row is an estimate of that effect's CPU use. The title shows the load of the whole synth and of all effects.
- The box at the bottom is the fixed final stage after all effects (it cannot be moved). From top to bottom it follows the signal: FINAL EQ → MASTER (volume) → LIMITER (v1.5). Click a row to show its panel, and use the dot to turn it on or off.
The rack (v1.6)
The right side of the FX page is a rack: the panels of all effects that are on are stacked from top to bottom in chain order (the Parametric EQ is one of them). Below them, after an END line, FINAL EQ and LIMITER are always shown (dimmed while they are off). With no effect on, the rack says "Turn on an effect in the FX CHAIN list" above the END section.
- Scroll with the mouse wheel or the slim bar at the right edge.
- Click a row in the FX CHAIN and the rack scrolls to that panel, which lights up briefly. If the effect is off, its panel appears dimmed at its place in the chain, so you can look at it and switch it on. It goes away when you select another effect; if you turn it on, it stays as a normal panel.
- Each panel has an on/off dot at the right of its title. It works like the dot in the list (turning on moves the effect to the end of the on group).
- Mouse wheel over knobs: once the rack is scrolling, knobs and drop-down lists under the mouse are not changed for about 0.5 seconds after the last wheel movement, so you can scroll past them. After you have stopped for 0.5 seconds, the wheel over a knob or drop-down changes it as usual.
- Jumping to an FX knob (clicking a destination in MOD LIST, the Mod Matrix, a cable) opens the FX page and scrolls the rack to that knob. Modulation cables to a knob that is scrolled out of view point to a tag at the top or bottom edge of the rack (for example "▲ DELAY 1"); cables to an effect that is off and not in the rack point to its row in the FX CHAIN.
Effects that are off use almost no CPU. Most effects have a Mix control (blend with the dry sound).
Heavy effects: Conv Reverb, Key Bloom and Multiband use a lot of CPU. If things get heavy, use fewer effects or lower Quality (Live) or FX Quality in GLOBAL (SOURCES on the OSC page).
The effects
EQ (parametric EQ)
A 6-band EQ. Because it sits inside the FX chain, it can be moved and modulated from the Mod Matrix (destinations EQ1-6 Freq / Gain / Q).
Drag the numbered points on the screen to change frequency and gain. Below, choose each band's type (Off / Low Pass / Band Pass / High Pass / Notch / Low Shelf / Peaking / High Shelf), slope (−12 / −24 / −48 dB/oct) and on/off.
The EQ panel shows the EQ inside the FX CHAIN (CHAIN EQ). (v1.6) Like the other effects, the EQ has an on/off switch (the dot in the FX CHAIN row and at the right of its panel title); when it is off, the sound passes the EQ unchanged. Each band's own On works as before. Songs and presets made before v1.6 open with the EQ on. The FINAL EQ at the end has its own panel in the END section of the rack; click the FINAL EQ row at the bottom of the FX CHAIN to go there (v1.6).
Distortion
| Effect | Main controls | Details |
|---|---|---|
| Distortion | Type (Soft Clip / Hard Clip / Tube / Fold / Custom), Drive, Output, Mix, Asym, Bias, Warp | Distortion. With Custom you draw your own curve with points on the screen (right-click to copy the curve of another Type). Asym = different distortion for the upper and lower halves, Bias = adds DC to push it to one side, Warp = lifts quiet parts (+, harder) or pushes them down (−, softer). These three work with every Type. |
| Saturator | Type (Tape / Tube / Transformer / Warm), Drive, Tone, Output, Mix | Gentle saturation that makes the sound fuller and warmer. |
| Bitcrusher | Bits, Downsample, Mix | Gritty sound from lower bit depth and sample rate. |
| Simulator | Mode, Size, Tone, Mix, Output | Adds the character of a speaker or device (table below). Load a User IR with Load IR.... |
Cleaner distortion (v1.1): Distortion and Saturator follow FX Quality in GLOBAL (default
×2): they run at 2x / 4x internally and use anti-aliased curves (ADAA). The harsh, unrelated grit that distortion normally adds (aliasing) is greatly reduced, so even high notes stay clean when pushed hard. If things get heavy, set FX Quality toOfffor the original, lighter processing (chapter 9).
Simulator modes:
| Group | Modes |
|---|---|
| Cabinet | Speaker 8in / Speaker 10in / Combo 1×12 / Cabinet 2×12 / Cabinet 4×12 / Bass 1×15 / Bass 2×15 / Open Back |
| Device | Small Radio / AM Radio / Telephone / Cell Phone / Megaphone / Walkie-Talkie / TV Speaker / Laptop / Earbuds |
| Bandwidth | Bandwidth 16k / 11k / 5.5k / 3k |
| Tone | Loudness / Smile / Mid Push / Air / Bandpass / High Only / Valleys / Hollow / Resonant Tube |
| User | User IR (your own WAV, such as a cabinet IR) |
Resonance
| Effect | Main controls | Details |
|---|---|---|
| Resonator | Type (String / Tube / Plate / Membrane), Pitch (Played Notes / Fixed), Note, Decay, Damping, Mix, Output | A pitched resonating body, tuned to the notes you play or to a fixed Note. |
| Key Bloom | Source (Scale / Played Notes), Key, Scale, Bloom, Tightness, Low / High, Fine, Octaves, Octave Shift, Octave Tilt, Output | Pitched resonance that makes the sound ring in a key and scale (or with the notes you play). It can turn noise or wobbling sounds into something that follows the song's key. Bloom = blend of dry and resonance (above 100% the resonance gets even stronger), Tightness = sharpness of the resonance (higher = clearer pitch and longer ring), Low / High = note range, Octaves = which octaves ring (All / Played Oct / Played ±1 / Played ±2). |
Modulation and width
| Effect | Main controls | Details |
|---|---|---|
| Chorus | Rate, Shape, Voices, Depth, Delay, Feedback, Spread, Mix | Chorus. Shape (v1.5) = the LFO waveform. Sine = the original smooth movement / Triangle = a linear sweep / Soft Tri = a triangle with rounded corners / Square = a rounded square (jumps between two values) / Saw Up, Saw Down = ramps / Random = glides to a new random target every cycle / Custom = draw your own. With Custom the LCD on the left becomes the drawing screen (same as the LFO Custom on the MOD page: drag points, double-click to add or remove a point, drag a segment up or down to curve it, right-click for templates, grid and flips). The drawn shape is saved with the preset and the song. Voices (v1.6) = the number of chorus lines (1 / 2 / 3 / 4 / 6 / 8). 1 = the original single line (the classic vintage design; old songs and presets keep their sound). More voices layer lines with evenly spaced LFO phases and slightly different delay times, for a thicker modern ensemble. With 2 or more voices, Spread also sets how far the lines are spread from left to right (0% = all in the centre, 100% = hard left to hard right). The level is matched to the single line, and Feedback is applied to the average of all lines, so more voices never make it run away (it just gets smoother). Changing the number while a sound is playing switches smoothly. |
| Hyper | Rate, Shape, Unison, Detune, Retrig, Mix | Stacks and moves copies of the sound for thickness. Shape (v1.5): the same 8 shapes as the Chorus; Random moves every voice differently, Custom is drawn on the LCD. |
| Flanger | Rate, Shape, Depth, Delay, Feedback, Spread, Mix | Flanger. Shape as on the Chorus. |
| Phaser | Stages (2-12), Rate, Shape, Depth, Center, Feedback, Spread, Mix | Phaser. Shape as on the Chorus. |
| Dimension | Size, Mix | Natural stereo width. |
| Pan | Position, Depth, Rate, Sync, Step: Instant, Shape, Phase | Auto-pan. Step: Instant (v1.6), right of Division: when the division changes while Sync is on (the Division knob, automation or a Mod Matrix Step), off (Wait) waits for a bar-aligned point and on switches at once (chapter 6, "Modulating tempo-synced rates and times"; turn it on when the switch itself makes the rhythm, as in a wobble). |
Effects with a Rate can be synced to note values with Sync. With FX Quality at ×2 / ×4, Chorus and Flanger use a more accurate interpolation while modulating (the highs stay brighter).
Delay and reverb
| Effect | Main controls | Details |
|---|---|---|
| Delay 1-3 | Time (or a note value with Sync), Feedback, Ping-Pong, Offset, Stereo Offset, Filter (Type / Cutoff / Resonance), Swap L/R, Mix | Three delays. Ping-Pong bounces left and right; Swap L/R swaps the sides. Offset moves the delay time earlier or later (it works with Sync too, for repeats that push or lay back while staying in time). Stereo Offset gives the two sides different times for a blurred width. New in v1.1: Position (where the Filter sits: Out = on the output only / Loop = inside the feedback, so each repeat gets darker with LP or thinner with HP; inside the loop the Resonance is tamed so the repeats never build up), Mod (tape-style pitch wobble, a mix of slow and fast movement), Diffuse (smears the repeats; it gets denser with every pass and melts into a reverb-like wash), Drive (gentle saturation inside the feedback; louder repeats get rounded off and stay under control). New sounds start slightly analog (Position Loop, Mod 12%, Drive 15%); older songs and presets load with the original values (Out, 0, 0). |
| Reverb / Reverb 2 | Type, Pre-Delay, Size, Decay (can sync), Damp, Mod, Width, Low Cut, High Cut, Filter, Mix | Two reverbs. Type (v1.1): Smooth = a smooth, warm reverb with a diffused onset, highs that fade naturally ahead of the Decay, and movement inside the tail / Classic = the original reverb. Mod = how much the tail moves (higher gives a chorus-like width). On Classic, 25% is the original (very subtle) movement; above 25% it gets deeper and faster (v1.1.1; 25% and below sound exactly as before). Higher Damp makes the highs fade sooner for a darker tail. New sounds start with Smooth and Mod 35%; older songs and presets load as Classic with Mod 25% (the original movement). |
| Conv Reverb | IR (Room / Hall / Plate / Cathedral / Spring / User File), Pre-Delay, Low Cut, High Cut, Mix, Output | Reverb using the response of a real space (IR). Load your own IR (WAV / AIFF / FLAC) with the Load IR... button; the IR then switches to User File. |
Dynamics
| Effect | Main controls | Details |
|---|---|---|
| Transient | Attack, Sustain, Speed, Length, Output, Mix | Strengthens or softens the attack and the tail. |
| Compressor | Threshold, Ratio, Attack, Release, Makeup, Knee, Mix | Compressor. Knee (v1.1) = the compression eases in over this range (dB) around the Threshold (0 = a hard knee, as before). The curve on the screen rounds off by the same amount. |
| Multiband | Depth, Time, Upward, Downward, In / Out Gain, Low / Mid / High Gain, Low / High Crossover | 3-band compressor that lifts quiet parts and holds down loud ones, for a bright, dense sound. |
| Sidechain | Source (Internal / External), Depth, Rate, Curve, Attack, Release, Threshold, Ratio, Ext Release | Rhythmic volume ducking ("pumping"). Internal follows the song tempo automatically (Rate = interval, Release = recovery length, Curve = recovery shape). External follows the DAW's sidechain input, such as a kick (Threshold / Ratio / Ext Release). Attack and Depth are used by both. |
| Pre Limiter | On, Input, Ceiling, Release, Attack, Soft Clip, Auto Release, Stereo Link, Look / Look Time | (v1.5) A second limiter you can place inside the FX CHAIN, with the same controls and behaviour as the final LIMITER. The whole FX CHAIN comes before the MASTER volume, so you can set the ceiling with Pre Limiter and then the overall level with MASTER (the usual "limiter → volume" order of most synths). Like any other effect, drag it anywhere or put it in parallel (it starts second to last, just before FILTER; in v1.5 it was last). Off by default. If Look (lookahead) is on in both Pre Limiter and the final LIMITER, the delay is the sum of both. (v1.6) When Look is on, everything that does not pass through Pre Limiter (sources whose FX In is Direct Out, sources that enter the chain after Pre Limiter, and the other effects and the dry signal of a parallel (‖) block) is delayed by the same amount, so all sounds stay in time (in v1.5 these sounded early by the lookahead time). Tempo-synced effects placed after Pre Limiter (such as Trance Gate) still run early by the lookahead time (up to 5 ms). (v1.6) Pre Limiter Input / Ceiling / Release / Soft Clip are Mod Matrix destinations (FX ▸ Pre Limiter). Moving Input with an LFO or envelope changes how hard it squashes (loudness), and moving Ceiling downwards turns the limiter into a level wobble (tremolo- or ducking-like). |
TRANCE GATE
A step gate that chops the sound. While the song plays, it follows the song's beat.
| Control | Details |
|---|---|
| Rate | Length of one step (note value). |
| Steps | Number of steps (1-32). |
| Length | How much of each step sounds. |
| Depth | Depth of the chop. |
| Attack / Release | How each step starts and ends. |
| Mix | Blend with the dry sound. |
On the screen, click a step to turn it on/off and drag up/down to change its level. Right-click for patterns (Default / All On / Clear / 1/8 Pulse / Offbeat / Invert / Random). The step pattern is saved with the sound.
FILTER (v1.6)
A filter you can place in the FX CHAIN. It is the same filter as Filter 1 / 2 on the FILTER page: with the same Type, Cutoff, Resonance, Drive and Morph it sounds the same (the same 19 types). It works on the mixed (stereo) sound, not per voice. Its default position is last (after Pre Limiter), and it is off by default.
| Control | Description |
|---|---|
| Type | Filter type (Lowpass / Highpass / Ladder / Diode / Scream / Comb / Vowel / Phaser and more, as on the FILTER page) |
| Cutoff / Resonance | Cutoff and resonance. The display on the left shows the frequency response (and, while the LFO or ENV moves it, the current cutoff as a line and a dot) |
| Input | How hard the sound hits the filter (−12 to +24 dB, default 0 dB). The sound is boosted before the filter and the same gain is taken off after it, so the volume stays about the same and only the Drive / resonance saturation changes. The FX chain receives a quieter signal than Filter 1 / 2 on the FILTER page, so if the same Drive sounds weaker here, raise Input (with one note, Ladder at Drive 60% and Input +11 dB sound almost the same as the voice Filter 1; chords reach the FX louder, so use less). Even with heavy saturation (e.g. Ladder at a high Drive) the level is matched automatically, so changing Input keeps the volume about the same and only changes the saturation. Types that do not saturate (Lowpass etc.) sound the same, so the knob is dimmed like Drive. The envelope follower (ENV) and the dry part of Mix use the sound before Input |
| Drive / Morph | As on the FILTER page (the knob is dimmed for types where it has no effect) |
| Stages / Voice | The same type-specific settings as on the FILTER page, to the right of Morph. With Allpass: Stages (1-32 stages, default 2; more stages delay the lows more, for a laser-like zap). With Formant / Vowel, a Voice slider in the same place (voice size: left = child, about 1/4 = woman, middle = man (default), right = large). With other types, Stages is shown dimmed and cannot be used |
| Mix | Blend with the dry sound |
| LFO: Sync / Rate / Division | Speed of the LFO that moves the cutoff. With Sync on it follows the song tempo (Division = length of one cycle) and locks to the song position while playing |
| LFO: Step: Instant | (v1.6) Right of Division. When the division changes while playing (the Division knob, automation or a Mod Matrix Step), off (Wait, default) waits for a bar-aligned point and joins smoothly, on switches at once (the phase may jump; turn it on for wobbles that switch "faster from this beat". Chapter 6) |
| LFO: Shape | Sine / Triangle / Soft Tri / Square / Saw Up / Saw Down / Random |
| LFO: Depth | How far the LFO moves the cutoff (+/- octaves) |
| LFO: Phase | Offset of the right channel's LFO (0° = both sides together, 180° = opposite; a stereo movement) |
| ENV: Attack / Release | Speed of the envelope follower (it follows the level of the sound coming into this effect) |
| ENV: Amount | How far a loud input moves the cutoff (+/- octaves; + opens like an auto-wah, - closes) |
| ENV: Gain | Sensitivity of the follower (level x Gain = 1 gives the full Amount) |
The Mod Matrix has the destinations FX Filter Cutoff / Resonance / Drive / Morph / Mix / LFO Rate / LFO Depth / ENV Amount / Input (FX ▸ Filter).
FINAL EQ / LIMITER
| Details | |
|---|---|
| FINAL EQ | A 6-band EQ after all effects and before the MASTER volume, for final shaping. It can be turned off. The graph is on the left (drag the points); type, slope and on/off for each band are on the right. |
| LIMITER | The very last limiter, after the MASTER volume. Keeps the output from getting too loud. Input, Ceiling, Release, Attack, Soft Clip, Auto Release, Stereo Link and Look / Look Time. Attack sets how fast the level starts to go down (0 = instant, which can distort low notes). A little slower means less distortion and more punch at the start of each note (the very start may go slightly above Ceiling; the always-on safety limiter at the end protects you). New sounds start at 2 ms; older songs and presets load with 0. With Look (lookahead) on, the sound is delayed by Look Time (0.1 to 5 ms) so the limiter can start turning down before a peak arrives (the least distortion). The plugin reports this delay to your DAW, which compensates for it automatically. However, when you switch Look on or off or change Look Time, some DAWs may drop out for a moment or only apply the new delay after you restart playback, so it is best to set it while building the sound and not change it during playback. When you play live, the sound is delayed by Look Time. |
Version 1.6.0 · 2026-11-08 · W3PC Audio · wav3pluscore.com